D'Licious​Chef Services, Confections & Events
  • HOME
  • ABOUT
  • CATERING
  • STORE
  • BLOG
  • CONTACT


​
Create the life you've always dreamed of....
One Moment at a time!

3 Fabulous FUDGE Recipes

12/6/2015

0 Comments

 
Picture
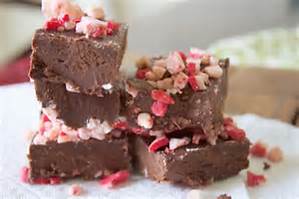
Ghirardelli® is my FAVORITE Ingredient in these Fabulous Fudge Recipes:) SO I thought I'd share!

Have fun in the Kitchen this Holiday Season with good friends or family....That's what I do to keep this season REAL!


Ghirardelli® Peppermint Bark Holiday Fudge

Ingredients

1 (14 oz) can condensed milk (sweetened or fat-free)
3 ⅓ cup Ghirardelli® 60% Cacao Bittersweet Chocolate Baking Chips
½ teaspoon salt
1½ teaspoons vanilla extract
10 Ghirardelli® Peppermint Bark SQUARES, (or peppermint candy) broken up
1 teaspoon of natural Peppermint flavor


DIRECTIONS 

1. Line a 9 x 9 inch pan with cling wrap. Set aside.
2. Combine chocolate with sweetened condensed milk in a microwavable bowl.
3. Cook on high (100% power) for about 1½ minutes or until chips are JUST melted. Take care not to overheat the mix. Stir after 1½ minutes. Don’t stir too much or the mix will get oily.
4. Gently stir in the peppermint bark and peppermint flavor.
5. Pour the thick fudge into your pan. Press evenly into the corners.
6. Leave fudge to set for 4 hours at room temperature or cover and leave it overnight.
7. Cut into squares or cut out shapes with cutters. Store fudge at room temperature (not in the
fridge) and wrap well so it doesn't dry out.

This fudge can be made a week in advance and kept up to 4 weeks.

Pumpkin Fudge

INGREDIENTS
½ cup unsalted pumpkin seeds (pepitas), toasted
3 cups Ghirardelli® 60% Cacao Bittersweet Chocolate Baking Chips
1 (14 ounce) can sweetened condensed milk
3 tablespoons butter
¼ cup pure pumpkin
¼ teaspoon salt
½ teaspoon pumpkin pie spice
1 teaspoon vanilla
1 teaspoon pumpkin pie flavor (optional)

DIRECTIONS

1. Prepare a 9x9 pan by lining it with cling wrap.
2. Scatter the pumpkin seeds evenly on the bottom of the pan and set aside.
3. Place the chocolate chips, butter and condensed milk in a large microwave safe bowl.
4. Heat on high for 60-90 seconds until melted. Take care not to overheat the mix.
5. Add the remaining ingredients and stir until well combined. Don’t stir too much or the mix will get oily.
6. Pour the mixture into the prepared pan and leave it to set at room temperature uncovered, for
3-4 hours.
7. After the fudge has set, remove from the pan and cut into squares.

Store leftover fudge in the refrigerator in an airtight container.


Maple Pecan Fudge

INGREDIENTS

1 ½ cups pecan halves, coarsely chopped
1/3 cup maple syrup
1/3 cup condensed milk (sweetened or fat free)
3 cups (1 ½ bags) Ghirardelli® Classic White Chips
½ cup brown sugar
1 teaspoon vanilla extract

DIRECTIONS

1. Line a 9 x 9 inch pan with cling wrap. Set aside.
2. Place pecans on a baking sheet and toast lightly in the oven at 350°F.
3. In a microwavable bowl add the maple syrup, condensed milk, white chips, and brown
sugar. Melt gently in the microwave or in a medium saucepan and heat over medium-low heat.
Don’t stir too much or the mix will get oily.
4. Pour into your lined tray.
5. Immediately top with pecans and press down lightly so that all the pecans are touching the
fudge.
6. Let fudge cool until firm. You can do this in the refrigerator, but if it’s cool enough in your house
you can cool it on the counter, covered with plastic wrap after it cools to room temperature. Slice
into squares (or triangles) and serve.

Fudge can be stored at room temperature, sealed in a container or plastic re-sealable bag.


0 Comments

Soft & Chewy Gingerbread Cookies

12/6/2015

0 Comments

 
These Gingerbread Cookies are so moist and delicious! Made with Coconut Oil instead of butter;) They will be gobbled up in no time!
Picture


Ingredients:
  • 3 cups all-purpose flour
  • 3/4 cup firmly packed dark brown sugar
  • 3/4 teaspoon baking soda
  • 1 tablespoon ground cinnamon
  • 1 tablespoon ground ginger
  • 1/2 teaspoon ground cloves
  • 1/2 teaspoon salt
  • 12 tablespoons coconut oil! Yes - that's my secret ingredient;) It's usually firm when stored in the fridge.....and sometimes even when it's not. 
  • 3/4 cup molasses
  • 2 tablespoons milk

 ICING Ingredients:
  • 2 Cups Confectioner's Sugar
  • 4 tsp coconut, almond or regular milk 
  • 4 tsp light corn syrup
  • 1/2 tsp. almond extract
  • gel food coloring


Directions:
  • In the bowl of a food processor fitted with steel blade, process flour, sugar, cinnamon, ginger, cloves, salt, and baking soda until combined, about 10 seconds. Scatter butter pieces over flour mixture and process until mixture is sandy and resembles very fine meal, about 15 seconds. With food processor running, add molasses and milk; process until dough is evenly moistened and forms soft mass, about 10 seconds.
  • Divide dough in half and roll into ¼ inch thickness between two sheets of parchment paper. Place in refrigerator at least two hours (or overnight) or place in the freezer for 15 to 20 minutes, until firm.
  • Adjust oven racks to upper- and lower-middle positions and heat oven to 350 degrees. Line two cookie sheets with parchment paper.
  • Once firm, remove parchment from dough and cut out cookies using a 5-inch gingerbread man or 3-inch gingerbread cookies. Place on prepared baking sheets spacing cookies 1 inch apart. Bake until centers are just set and dough barely retains imprint when touched very gently with fingertip, 8 to 11 minutes. Rotating the baking sheets halfway through. Cool the cookies on the baking sheets about 2 minutes; using a wide metal spatula, transfer the cookies to a wire rack and cool to room temperature. Decorate as desired with icing.
  • Gather scraps; repeat rolling, cutting, and baking in steps 2 and 4. Repeat with remaining dough until all dough is used.


ICING DIRECTIONS:
  1. In a small bowl, stir together confectioner's sugar and milk until smooth, adding a few more drops of milk if necessary.
  2. Beat in corn syrup & extract until smooth and glossy.  If it's too thick, add more corn syrup.
  3. Separate into several small ramekins if using different colors of gel. Add you gel until you get the desired colors to decorate!
  4. HAVE FUN by spreading with your fingers, a popsicle stick, brush or piping bag. I used a toothpick to drag into fun designs in the picture above. 

Recipe Note:if you want really hot and spicy gingerbread men you can add up to ¼ cup ground ginger.


0 Comments

Sugar Cookies you'll Never Forget!

12/5/2015

0 Comments

 
Picture
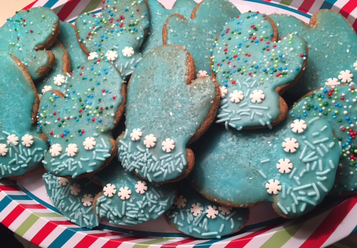
If you’ve been looking for the perfect sugar cookie recipe for cutouts….then this is definitely it! I’ve been making these delicious cookies for…… oh my goodness, I’m not going to actually tell you how many years! Deliciously mild flavor….. and the best part is, they don't spread out in the oven!  These pictured are my Cocoa Version. Such a nice twist and makes these cookies much more than your everyday, run of the mill sugar cookie:)  Gingerbread can be frosted the same way....Stay tuned for that recipe next!  I make my gingerbread cookies with Coconut Oil rather than butter.  So much better for you.

So Here we go.................................................


Ingredients

For the Cookies
  • 5 cups all-purpose flour, plus more for rolling out your dough
  • 2 cups granulated sugar
  • 4 eggs
  • 1 1/2 cups unsalted butter (3 sticks), softened
  • 1 1/2 teaspoons vanilla, almond, peppermint, or coconut extract
  • 2 teaspoon baking powder
  • 1 teaspoon salt
  • 1/4 Cup of Dark Cocoa Powder (if desired)
For the Frosting
  • 2 cups powdered sugar
  • 1 tablespoon honey or lite corn syrup
  • 2-4 tbsp. milk
  • 1 teaspoon vanilla, almond, peppermint, or coconut extract
  • Food coloring
    Instructions
  1. In the bowl of a mixer fitted with the paddle attachment, cream together butter and sugar. Mix in eggs and extract until well-combined.
  1. In a separate bowl, whisk together remainder of cookie ingredients. Add dry ingredients to wet in batches until combined.
  1. Divide dough into quarters, form into discs, and wrap in plastic wrap and chill for at least 2 hours.
  1. Preheat oven to 400°.
  1. Removed one disc from fridge and roll out on floured surface until dough is 1/8"-1/4" thick.
  1. Cut with cookie cutter and baked on an ungreased cookie sheet for 6-8 minutes, watching closely. Cookies are done when bottoms are just barely golden brown. Let cool completely on wire racks before frosting. Make sure cookie sheets are cool to touch before place more cookie dough on them.
  1. For frosting, combine sugar, two tablespoons milk, and honey or Corn Syrup, adding more milk until frosting reaches desired consistency. For piping and spreading, you're looking for a thicker frosting (like cake frosting), for dipping or brushing cookies, you'll want it a little bit thinner.
  1. Pipe, spread, brush or dip onto cookies. Will dry to a soft frosting with a glossy coating. If you'd like to use sprinkles, apply them before the frosting dries.
  1. ENJOY FOLKS….AND SO WILL YOUR FRIENDS!


0 Comments

Healthy Hot Chocolate :)

12/1/2015

0 Comments

 
Picture
Who Says you can't have a deliciously creamy Hot Chocolate...that's actually HEALTHY?  Try this one...... instead of those HIGH Sugar Package Brands!  It's YUMMY!  I'm sure you'll be doubling, tripling or quadrupling this recipe:)

ENJOY & Happy Holidays!


  INGREDIENTS

  
  • 1 cup, plus 1-2 tablespoons milk of choice (Almond, Hemp, Rice, etc.)
  • 2 rounded teaspoons unsweetened DARK Cocoa Powder 70% OR HIGHER
  • 1 teaspoon raw sugar (Stevia or sweetener of choice)
  • ¼ teaspoon vanilla extract or real vanilla bean
  • Cinnamon, nutmeg, optional
  • Cool Whip (Sugar Free)

     DIRECTIONS

  1. Place 1 cup milk in a small pot over medium low heat.
  2. Meanwhile, place cocoa powder, sugar, and the 1 extra tablespoon of milk in a small bowl. Whisk until a paste/thick mixture forms and powder is absorbed. Add additional tablespoon of milk, if needed.
  3. Whisk cocoa mixture into milk mixture. Heat till hot but not boiling. Stir in vanilla extract.
  4. Pour into a mug, dollop with cool whip and sprinkle with cinnamon or nutmeg!
  5. Enjoy!

Notes
The directions above are for a stovetop preparation, but you can just as easily make this in the microwave.

Multiplies easily if you need more than a single serving.


0 Comments

    Chef Notes!


    Welcome!

    I'm a Personal Chef , Sweet Maker, Event Planner and Philanthropist.......Creating and Celebrating the Art of Food, 
    an Organized Home and Fresh, Healthy Living.


    Each Day is a Gift! Open it, Celebrate it, Enjoy it, Share it!

    Most of all....Eat D'Liciously!
    A percentage of our proceeds are donated to Feeding the Poor,
    Animal Cruelty and Preserving our Beautiful Planet!


    I'm the youngest of six girls, happily married and have two wonderful sons, two new amazing granddaughters (OMG)...and a fabulous French Bulldog Gizmo.  I enjoy spending quality time with friends and family, reading home improvement mags, playing with my dog, gardening, fishing, cooking & baking (of course), entertaining and helping others in need.  I write poetry and dabble in painting and other artwork.  The joy of cooking and designing food has always been a part of my life......and quite naturally.....The Domestic Stylist was finally born! Rebranded to EatD'Licious - D'Licious Chef Services, Confections & Events - October 2016! (WooHoo).

    I'm a personal chef and our services extend beyond just that.  We also provide meals to the home-bound and elderly, design fabulous wedding and event cakes, cookies, pastries and desserts!  I hope to share all of my passions here with you!

    Archives

    December 2020
    March 2020
    January 2020
    September 2019
    December 2018
    October 2018
    September 2018
    August 2018
    July 2018
    May 2018
    February 2018
    November 2017
    August 2017
    June 2017
    May 2017
    February 2017
    January 2017
    November 2016
    October 2016
    September 2016
    August 2016
    June 2016
    April 2016
    February 2016
    January 2016
    December 2015
    November 2015
    October 2015
    August 2015
    July 2015
    June 2015
    May 2015
    April 2015
    March 2015
    February 2015
    January 2015
    November 2014
    October 2014
    August 2014
    July 2014
    June 2014
    May 2014
    March 2014
    February 2014
    January 2014
    December 2013
    November 2013

    RSS Feed

    Archives

    December 2020
    March 2020
    January 2020
    September 2019
    December 2018
    October 2018
    September 2018
    August 2018
    July 2018
    May 2018
    February 2018
    November 2017
    August 2017
    June 2017
    May 2017
    February 2017
    January 2017
    November 2016
    October 2016
    September 2016
    August 2016
    June 2016
    April 2016
    February 2016
    January 2016
    December 2015
    November 2015
    October 2015
    August 2015
    July 2015
    June 2015
    May 2015
    April 2015
    March 2015
    February 2015
    January 2015
    November 2014
    October 2014
    August 2014
    July 2014
    June 2014
    May 2014
    March 2014
    February 2014
    January 2014
    December 2013
    November 2013

      I'd love your feedback!

    Submit
Contact Us Today!
  • HOME
  • ABOUT
  • CATERING
  • STORE
  • BLOG
  • CONTACT